This article is about how I took the principles of the emerging MOJO (mobile journalism) movement and successfully applied them to a new teaching job. I have tried to keep things short while providing enough detail to encourage like-minded people to do something similar. If I have missed anything please get in touch.
In September 2016 I had the pleasure of returning to teach at Durrington High School in West Sussex. In the decade since i'd last worked there Sue Marooney and the team had accomplished some impressive educational feats - year on year incremental improvements across the board making it a place that both teachers and students seek out. I had the strong sense that I was participating in a teaching culture that punched well above it's weight.
The MOJO movement
Glen Mulcahy and Marc Blank-Settle are two key figures encouraging traditional news and journalism institutions across the world to embrace the mobile phone revolution in their approach to producing broadcast materials. While there are tons of different approaches, the general idea is for news teams to embrace a lighter (more mobile) tech footprint while retaining excellent standards.
My interest in this kicked off through the documentary work I had been doing exploring worldviews while teaching Religious Studies at another school. While I have a 'serious' film kit with a combination of fluffy obtrusive pro-microphones, these are cumbersome and require a certain amount of inflexibility. With this new approach to capturing material my equipment can be with me all of the time and deployed within ten minutes. I have provided some equipment/software details at the end to save boring some people senseless. I love you Fiona.
#TeachingTalk enabled
After successfully trialling this new approach, Shaun Allison encouraged me to step out further and explore teaching practice across the school community. To date I have completed 23 'episodes' of #TeachingTalk that would have been virtually impossible without the flexibility provided by the MOJO set-up.
What was the value of #TeachingTalk?
From a purely non-tech point of view there is tremendous value in making time to be open about your teaching and thinking. It breaks down the possibility of arrogant blind-spots and strengthens others who may have similar struggles. Andy Tharby explains here why choosing to talk is a healthy option for overworked conscientious teachers:
From a personal (more technically-minded) perspective, I think there are some terrific advantages to this project:
people (and their professionalism) are powerfully affirmed - I often felt that my interviewees were sharing important ideas and insights that are really worth hearing about
the interviewee develops their own convictions - in the clip above, Andy is right to say that the explaining/presenting of something always clarifies our own thinking
a clearer perception of what the wider teaching community is doing - this is where the power of technology is properly felt. It's reach counters that all-too-familiar sense of isolation and helps a wider audience to see how others are getting on
the sharing of good ideas and contextual thinking - yes you can't simply drop an approach on every context and expect roses to grow, but you can step into different contexts while reflecting on your own
if it is done well, it builds trust - my personal approach is to make it clear to teachers that nothing will be used without their permission. Being filmed (and then sharing this online) puts someone in a position of vulnerability, so it is important that those who are being captured are happy with how they come across. This is a potential minefield, but is definitely a path worth treading. Occasionally I have had to withdraw pieces (some which were amazing) because the people being filmed were unhappy. Occasionally I had to try and explain why the piece was really valuable and worth going along with. For this reason it is worth restating how appreciative I am of the colleagues who agreed to taking part in this project.
With or without the equipment (and documentary-obsessed teaching staff) there should be no reason why schools aren't seeking to develop a culture of reflection and sharing. It's a healthy no-brainer.
Now what about your MOJO set-up?
Currently I am using this equipment:

iPhone 7 Plus and FilmicPro - I consider myself fortunate enough to be able to have this expensive phone and it does the job brilliantly. I use a 256 gigabyte storage just in case. Occasionally I get near to filling it with 4k footage. It has the added advantage of being weather-resistant. I once shot some footage underwater and it worked beautifully. For the budget conscious - there are lots of other possibilities - the iPhoneSE is both compact and captures superb 4k material if needed. Filmic Pro is pretty much the standard recording app. It has lots of superb features that are genuinely useful.
a Manfroto monopod and Glif/Shoulderpod grip - this works better than a tripod because a. it can move and b. the weight of the hanging arm creates a really handy balancing effect. I tried some gymbal systems but none of them worked that well - especially with a microphone which is crucial. Also note that I rarely use the monopod against the floor. Hanging is always better even if your arm gets a bit tired. Also the ability to extend it and reach extreme heights is awesome - like a selfie-stick on steroids. The Glif is recently new (and works superbly - particularly the quick release function) but I originally used the shoulderpod for ages - either are great.
a flexible ball mount - this provides an immediate way of changing the angle for those occasionally different shots. I leave mine permanently attached to the monopod. The extra weight is worth it.
on board and mobile microphones - I use the Zoom iQ7 with a RODE Deadkitten (Shaun Allison keeps calling it names that I don't really understand) as my default sound-capturing method. For remote recording I use an older iPod Touch with a Sennheiser Digital ClipMic. I usually record the remote audio using Ferrite - with a fully charged iPod I just set the recording going and can get up to an hour and half.
Anker battery pack - there are lots of these around and they are very good indeed for portable serious battery back up. Never leave home without it.
Lights - currently I don't bother with LED lights because the situation doesn't need it at the moment.
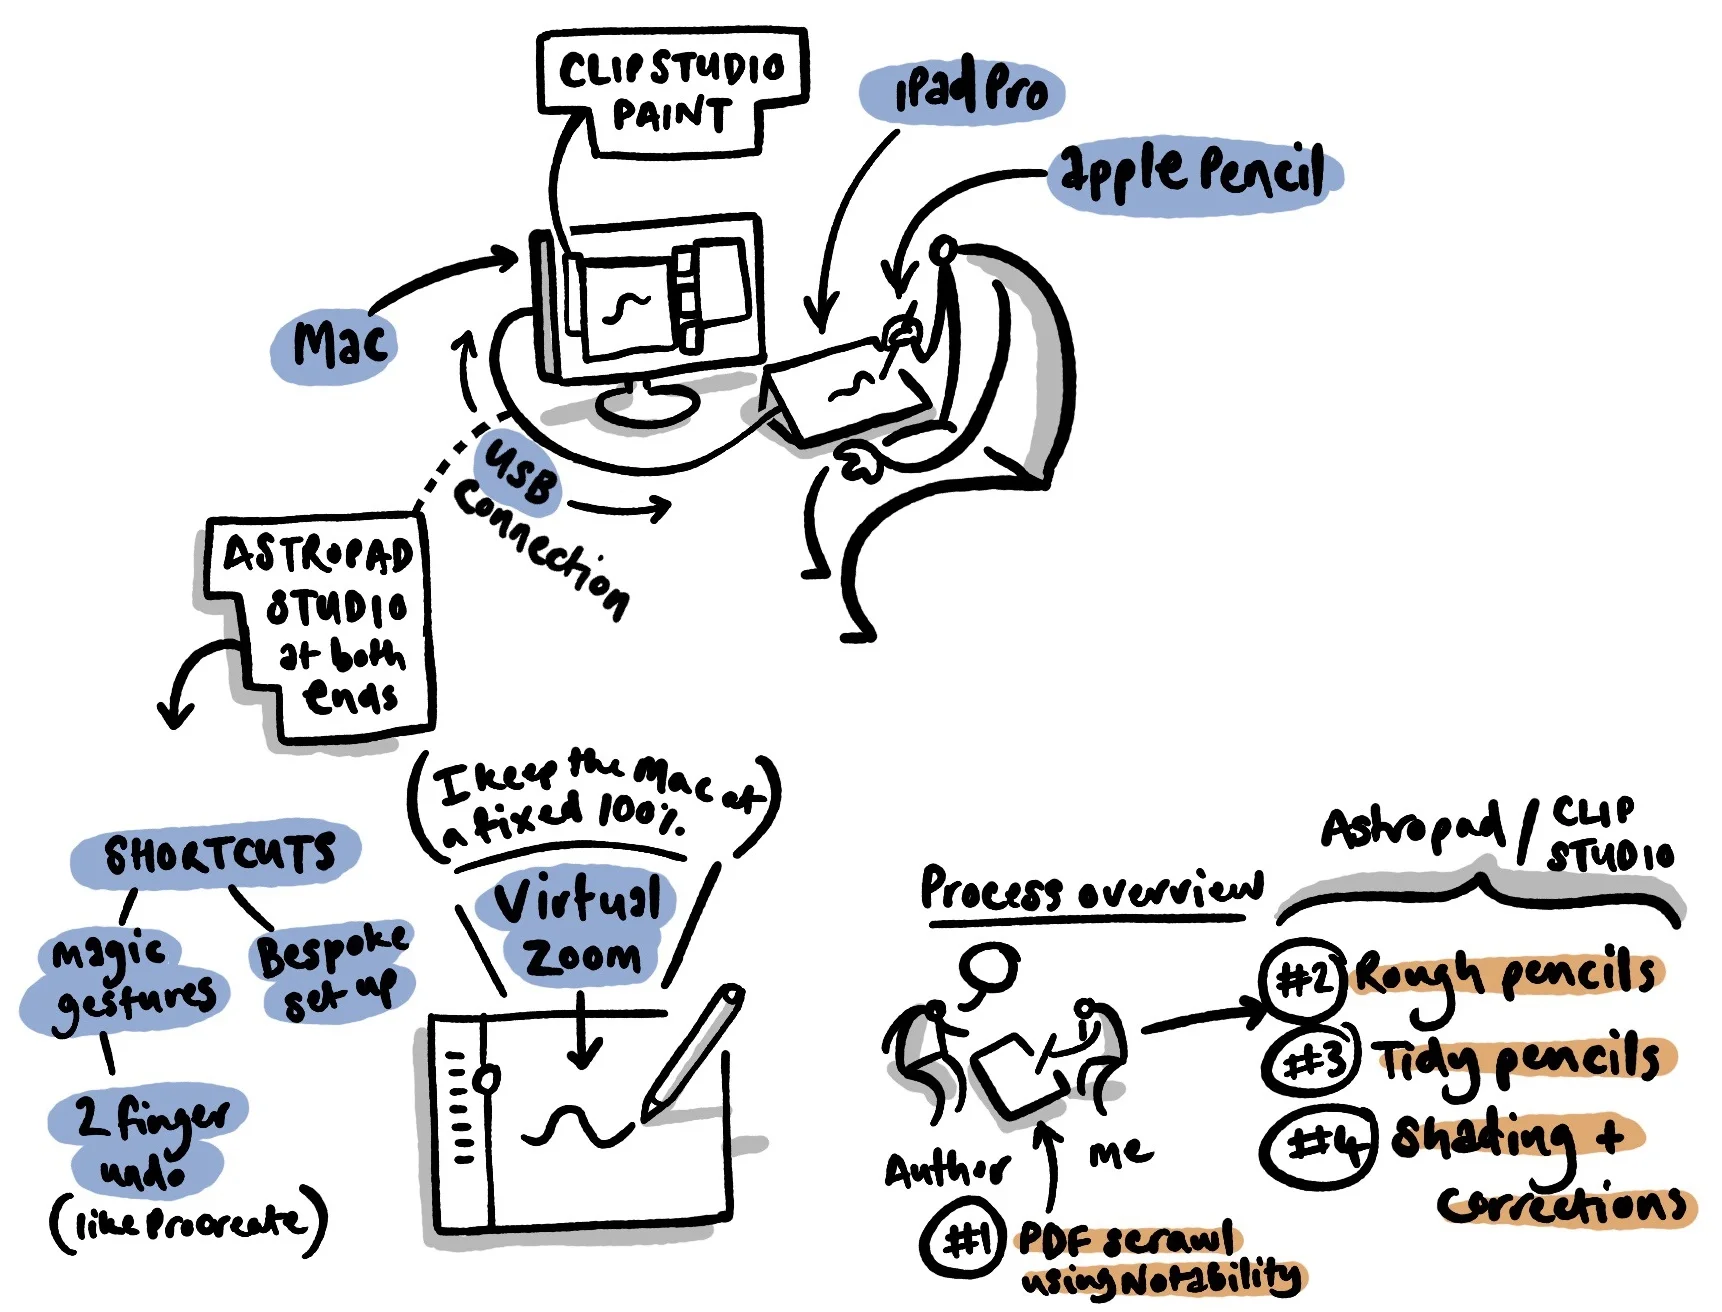
Editing - if I was editing on the go I would use LumaFusion which is a seriously great mobile multitrack video editing tool. My own personal situation means that it is actually easier for me to important my footage onto a Mac and chop material using FCPX, which is the daddy as far as I am concerned.
For those still here - what are the pros and cons?
Advantages
having your equipment with you all the time means getting those opportunities which would otherwise not happen - capturing sensitive perspectives means having flexible mobile and unobtrusive kit.
being able to make eye-contact and talk intimately takes a bit of practice but this set-up absolutely allows for it to happen relatively easily. If you have a look at the episodes produced, most of the people are making near-eye contact with the camera. This is an approach that Jonathan Demme popularised and Errol Morris swore by.
shooting in 4k means that if you shoot stuff at an odd angle (which often happens because you have to really focus on the person not the shot) you can edit the sequence at 1080p and crop in/rotate the image with no discernible loss.
Disadvantages
mobile phones do not have the delicious flexibility of a zoom lens. This often feels like a major deal-breaker. When I am shooting stuff with my 'serious' camera I love the freedom to smoothly zoom in and out. BUT there is a way forward - if you shoot in 4k you can crop-in on the subject and actually get even closer still with no problems. It isn't the same and feels really different but creativity is all about working intelligently within the limits.
All 23 episodes of #TeachingTalk can be watched here. If I have missed anything or if you have feedback then please get in touch.